How to make use of Audio and Video Transcoding
Table of Contents
This is a comprehensive and pragmatic overview of everything I know about audio and video transcoding.
Relevance #
Why should you learn about audio and video codecs?
For me it all started with this:

That’s my homeservers CPU jumping to 80% load when I played a movie in Jellyfin. I was informed of the reason: some transcoding was happening.

I would hear the fan roar every time my wife was watching her series. And it doesn’t scale either. Watching a second movie simultaneously would max out the CPU and decrease playback quality since the server can’t keep up.
I had to figure this codec issue out 🙂
For you the reason to learn about encodings might be:
- Reduce the file sizes of your media and conserving disk space
- To understand torrent labels
- Because you want to combine together a bunch of clips you collected
- Or simply out of curiosity.
Let’s start with analysing and picking the codecs that are right for you:
Codecs #
A codec is the spec for how audio or video data is stored. What differentiates them is their different approaches to compressing the data (getting rid of information ideally without you noticing1.) I will speak to how this effects perceptible quality and file size.
What codecs you choose depends on your circumstances:
- Where are you watching? Laptop, monitor, TV, home cinema?
- How much storage capacity do you have and want to use?
- What codecs does your video playback application support?
In my case I’m making my media available to be streamed in the browser (via Jellyfin.) The only browsers I care to support are the latest Firefox and Chromium. With that in mind I have chosen these as my preferred codecs: AV1 for video and Opus for audio.
Here is an overview of the most widely used codecs and why I decided on AV1 and Opus:
Picking a video codec #
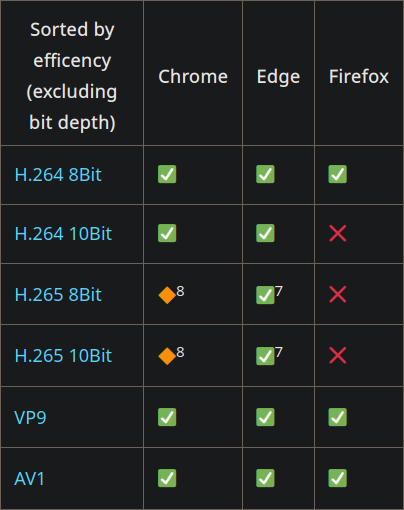
I started with this table. You can see the codec support Jellyfin has in the browsers I picked.

VP9 can be excluded as it’s the predecessor of AV1. Let’s look into the other three in some detail.
H.264 (AVC) #
The standard video codec of old. Has the best possible browser support and is widely used.
H.265 (HEVC) #
The successor of H.264 capable of compressing up-to 50% more (while retaining the same perceptible quality.) Thus saving a significant amount of storage space.
Looking at the compatibility table above, I had to exclude H.265 for my use-case though. It has no Firefox support and I haven’t even managed to get it running for myself in Brave on Linux. I can’t expect this to work for most people. It would mean constant headaches and maintenance work on my end. It’s not an option for me.
AV1 #
AV1 boasts a compression rate even better than H.265 and with that better quality at the same bitrate.
On top of that AV1 is licensed as royalty-free unlike the commercial H.26X family.
With this, and great support in modern browsers, AV1 is the obvious choice for me.
Bit depth #
The compatibility table also mentions bit depth. 10bit will be smaller size and better quality. In my eyes the difference is so slight that I pretty much ignore bit depth.
Picking an audio codec #
With Jellyfin audio transcoding is not nearly as resource-intensive as video transcoding. And I am not using surround sound capable speakers, so I don’t really care. But if I’m already transcoding something I might as well put it into the best available audio codec while I’m at it.

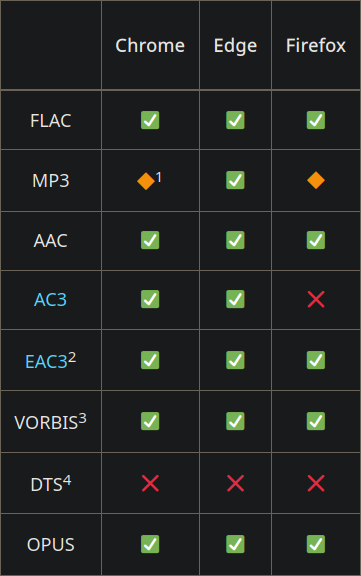
Looking at the table we see that we can pretty much use whatever codec we want (with the exception of DTS and AC3.)
The one I went with was Opus, since it’s open-source and boasts the same quality as other codecs at higher compression rates2.
Transcoding #
Now that we have the codecs we want to use the obvious question is: How do we encode a media file with that codec?
That requires some understanding of FFmpeg, so let’s have a look at it’s syntax.
FFmpeg syntax #
With FFmpeg you have one or more input files and a single output.
You specify inputs with -i and the output as the last argument without any
flags.
ffmpeg -i in.mp4 out.mkv
Before you can tell ffmpeg what to do,
you first need to tell it what you want to work on.
You do this with -map.
Your inputs are zero indexed.
To make use the whole first input you can do:
ffmpeg -i in.mp4 -map 0 out.mkv
I said the whole first input because what -map 0 does is that it picks up all
the available input streams.
You can also target these separately: -map 0:a for audio, -map 0:v for video
and -map 0:s for subtitles.
The advantage being that you can easily combine the video stream from one file
with the audio stream from another and add in the subtitles from an .srt file.
Please refer to FFmpeg’s excellent -map documentation
if you want to go deeper on this.
To see what streams are included in a file and on what index they are available,
pass the input ffprobe using the same order and -i flags.
For my transcoding I want to make use of all the video, audio and subtitle
streams of my single input file.
By using -map 0 I ran into problems.
From time to time I came across weird embedded streams that FFmpeg
didn’t know what do with, throwing an error.
So I always specify that I want to use audio, video and subtitles separately.
To only use them if the stream is available (and avoid error à la “this file has
not subtitle stream”) you can append a ?, like so:
ffmpeg -i in.mp4 -map 0:v -map 0:a -map 0:s? out.mkv
Now that we have declared what parts of the input file we want to use, we can finally tell FFmpeg what we want to do with them.
The simplest statement is copy.
So to just copy over the subtitles without doing anything to them we can say -c:s copy.
To transcode our video to AV1 we specify the library to use: -c:v libsvtav1.
To see the available encoders and their options see FFmpeg’s AV1 page3.
More on presets and quality later.
For transcoding our audio to Opus we specify: -c:a libopus.
And with that have our first working ffmpeg transcoding command:
ffmpeg -i in.mp4 -map 0:v -map 0:a -map 0:s? -c:v libsvtav1 -c:a libopus -c:s copy out.mkv
This will use the encoding library’s defaults. We will want to tweak them depending on our situation.
Let’s look at Opus first.
You can specify the bitrate.
FFmpeg recommends at least 64Kbps4.
I go with either 128Kbps or 192Kbps (specified as -b:a 192k.)
AV1 encoding options will have a major impact on file size,
picture quality and encoding duration.
Please see this article on see how the -crf and -preset
play together and how they influence those three factors.
Based on the conclusions from the article and my own requirements I have chosen
a preset of 8 for decent file size and encoding time5.
For -crf I vary from 38 – for old cartoons where less detail actually looks
better to me – to 20, when I want to retain higher quality.
With this we have the final version of our command and are ready to start transcoding:
ffmpeg -i in.mp4 -map 0:v -map 0:a -map 0:s? -c:v libsvtav1 -crf 30 -preset 8 -c:a libopus -b:a 192k -c:s copy out.mkv
Examples for the effect of -crf #
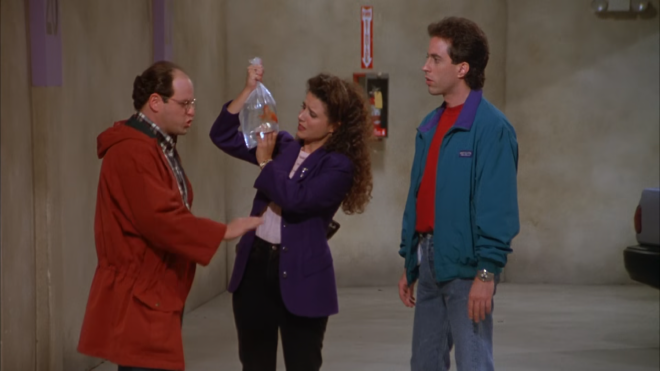
Encoding at a crf of 30 and a preset of 8 I get file sizes like these:
- All seasons of Seinfeld in 1080p at 51GiB (average episode is 300MiB)
- All seasons of The Office in 1080p at 45GiB, (average episode is 240MiB)
Transcoding speed was about 2-2.5 seasons in a 8h session while nearly maxing out my CPU with a combined processing power of 16.20GHz.
Pausing on some shots you will definitely see some artifacts, but in motion it looks fine to me.
Here are two transcodes of the same file at different quality levels:
With a lower preset you get achieve an even smaller file size (and slightly better quality.) It will just take longer to encode5.
Common transcoding problems #
Our last assembled command will fail if there is 5.1 surround audio.
Until they adjust the default setting to not crash you fix it with
-af 'channelmap=channel_layout=5.1'.
If you get an error complaining about stereo audio, you will have to remove this
modifier though.
I already mentioned marking input streams as optional, so the process does not
error out if they are not available: -map 0:s?.
My transcoding flow #
This is very specific to my circumstances but I wanted to share it as an example. Feel free to skip it.
I move all the files I want to transcode into a specific directory on my server. Then this script generates the encoding commands for me, which I can adjust and reorder if needed.
ssh home 'find ~/media/transcode' -name "*.mkv" -or -name "*.mp4" | grep -ve "/out/" -e "/later/" -e "/done/" | cut -d/ -f6- | while read file; do
    name="$(basename "$file" | sed "s/HEVC//; s/x265//; s/'//g")"
    echo "nice ffmpeg -loglevel error -i '$file' -map 0:v -map 0:a -map 0:s? -c:v libsvtav1 -crf 35 -preset 8 -c:a libopus -b:a 192k -af 'channelmap=channel_layout=5.1' -c:s copy 'out/$name'"
done
This script ensures that mkv files stay mkv (they would complain about becoming
mp4s) and that that are no ' in the output file name (which would mess up the
command execution.)
This list of commands I then copy into another script I use for running arbitrary code on my server:
#! /bin/sh

run_command() {
cat <<EOF
cd '/transcode'
mkdir -p out

nice ffmpeg -loglevel error -i 'Dave Chappelle Deep in the Heart of Texas (2017) (1080p NF WEB-DL x265 HEVC 10bit AC3 5.1 t3nzin)/Dave Chappelle Deep in the Heart of Texas (2017) (1080p NF WEB-DL x265 10bit t3nzin).mkv' -map 0:v -map 0:a -map 0:s -c:v libsvtav1 -crf 30 -preset 8 -c:a libopus -b:a 128k -af 'channelmap=channel_layout=5.1' -c:s copy 'out/Dave Chappelle Deep in the Heart of Texas (2017) (1080p NF WEB-DL  10bit t3nzin).mkv'
nice ffmpeg -loglevel error -i 'All.Light.Everywhere.2021.1080p.BluRay.x265-RARBG/All.Light.Everywhere.2021.1080p.BluRay.x265-RARBG.mp4' -map 0:v -map 0:a -c:v libsvtav1 -crf 26 -preset 8 -c:a libopus -b:a 192k -af 'channelmap=channel_layout=5.1' 'out/All.Light.Everywhere.2021.1080p.BluRay.-RARBG.mp4'
EOF
}

echo "#!/bin/bash" >/tmp/run
run_command >>/tmp/run
chmod +x /tmp/run
scp -q /tmp/run home:
ssh home 'docker run --rm --volume /root:/root --volume "/mnt/user/media/transcode":/transcode -t worker "./run"; rm run' &
The docker stuff at the bottom is very specific to Unraid where I don’t really have the ability to just install the required dependencies on the system itself. So I have setup an Arch container where I just install whatever I need and then have this my script run in there.
Torrent Quality #
Another place where encodings come up are when browsing for torrents. For many years I saw these arcane combinations of letters and numbers without knowing what they meant. I just looked for what I knew, which was resolution and picked whatever was smallest. Now though, with our new-found knowledge we can understand what those labels mean!
Picking a random movie, we look at a few example titles and decipher them together:
Anatomy of a Fall (2023) (1080p BluRay x265 HEVC 10bit EAC3 5.1 French Silence) [QxR]
We got the name, year and resolution.
So far so obvious.
Next is the encoding source: BluRay.
Then the video codec: x265/HEVC with 10bit depth.
And audio codec: EAC3 (aka DDP/DD+) in 5.1 surround sound.
Lastly we got French to let us know that the only included audio track is
french and lastly the tags of the encoding group.
Anatomy Of A Fall (2023) 1080p H264 iTA Fre AC3 5.1 Sub iTA EnG-MIRCrew
This one is encoded in H264 instead.
It also includes an Italian (iTA) audio track on-top of the French (Fre) one.
The audio encoding is different: AC3 (DD) and it specifies the subtitles which
are included.
What is notably missing is the encoding source. It’s not mentioned in the description either, so we can only guess.
Anatomy.of.a.Fall.[Anatomie.D.Une.Chute].2023.1080p.WEB-DL.x264.AC3-HORiZON-ArtSubs
Next we have the original french title included and WEB-DL as the encoding
source.
The x264 encoder was use to encode to h.264.
Anatomy of a Fall 2023-FR-1080p-HD-WEBRip-2.76GiB-AAC-x264 [PortalGoods]
Our last example has WEBRip as the encoding source and AAC as the audio codec.
With that we have seen the most common labels.
AV1 can of course also show up as the video codec, but it’s still kind of rare.
With video and audio codecs you should already know what you are and aren’t
looking for.
The most important label relating to quality is the:
Encoding source #
Here are the different types, ranked in order of quality from best to worst:
BluRay, also calledBRandBRipWEB-DL, also known asWEB. Sometimes the platform it was downloaded will be specified:AMZN WEB-DL,NF,iTunes, etc.WEBRipHDRipDVDRip, resolution is always less than720pCAM
BluRay and DVDRip are obvious.
Straight encodings from the physical medium.
WEB-DL is the result of a group downloading the desired media from a streaming
service and breaking the encryption.
With WEBRip they are not breaking the encryption, but are instead recording
their screen while streaming the media.
There is a noticeable quality difference between WEB-DL and WEBRip, since the
former has access to the raw data.
Below you can see an example of what the different between WEBRip (first picture) and WEB-DL (second picture) can look like. Take a look at the roof of the car on the right. It looks much more crisp in the WEB-DL version.
HDRip are screen captures of a show/movie on TV and commonly include the
stations logos, announcements and banner ads.
CAM are camera recordings of the screen in the cinema and are not an option in
my mind.
The quality is that terrible.
Just wait for the digital release and a WEB encoding or go to the cinema.
There are also torrents with the REMUX label.
It means the data was not encoded, that the source streams were just repackaged
into a container without any compression.
These will be huge 60GB files per movie, usually copied directly from the
BluRay.
With those kinds of sizes they are not an option for me.
They are the best quality you can find available.
Bitrate #
There is another thing that has a notable impact on media quality: the bitrate.
You will be able to find it in the description or the mediainfo dump of most –
but not all – torrents.
…
Video
ID                                       : 1
Format                                   : AVC
Format/Info                              : Advanced Video Codec
Duration                                 : 1 h 42 min
Bit rate                                 : 1 955 kb/s
…
The range I’m looking for is from at least 1.500 kbps up-to 4.500 kbps. Some people would call that bitrate-starved, I call it diminishing returns. I’m also watching on a laptop. In a still frame I might be able to spot some minimal differences, but it’s a moving picture.
You can check the bitrate on any given file with: mediainfo file.mp4
Yify releases are good enough for me with most movies (and they are always in H264.) There are only a few with bombastic pictures like Avatar, Blade Runner or Dune where I will go for higher bitrate releases to get a nicer looking movie.
At low compression rates the difference will be imperceptible. The higher you turn up the compression rate the smaller the file size and the lower the perceived quality. Compression is about finding a balance that is acceptable to the end user with the trade-off being quality vs file size. Some compression algorithms are better than others and will results in better perceptible quality at the same file size (the amount of information.) ↩︎
Do not use libaom for real-world use. It is the reference implementation and significantly inferior in performance to the implementations that came after it. ↩︎
I would consider going down to a preset of 6 if I really cared about the transcode to get a slightly smaller file size and slightly better quality. Usually that’s not worth the doubling the encoding time though. ↩︎ ↩︎


